本稿では macOS におけるパッケージ管理ソフト Homebrew をインストールする手順について解説します。 なお、本稿では macOS Mojave (10.14) で手順の動作を確認しています。
必要条件
Homebrew を macOS にインストールするための条件は以下のようになっています。
- ご利用の mac の CPU が Intel 製であること。
- macOS のバージョンが 10.12 (Sierra) 以上であること。
- Command Line Tools (CLT) for Xcode がインストールされていること。
Command Line Tools (CLT) for Xcode のインストール方法については、以下で解説します。
事前準備
Homebrew を macOS にインストールする前に、Command Line Tools for Xcode をインストールしておく必要があります。 ターミナルを開き、コマンドラインツールをインストールするために次のコマンドを実行します。
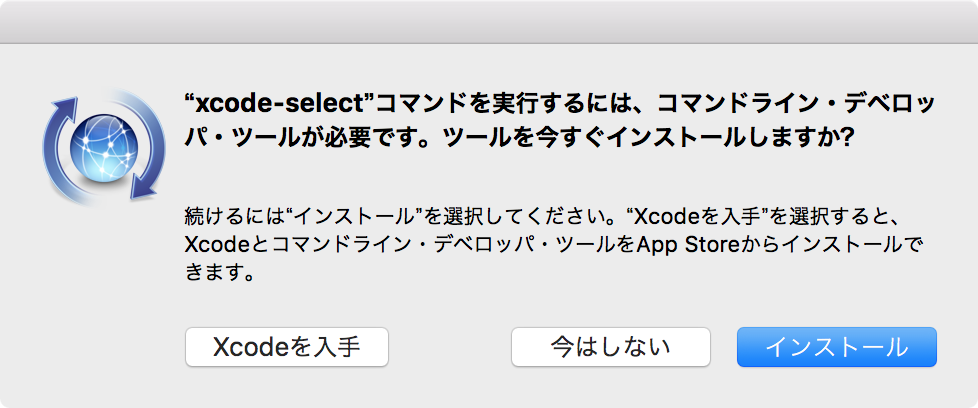
$ xcode-select --install

xcode-select: note: install requested for command line developer tools
すると次のように確認のダイアログが現れますので「インストール」をクリックして Command Line Tools for Xcode のインストールに進みます。
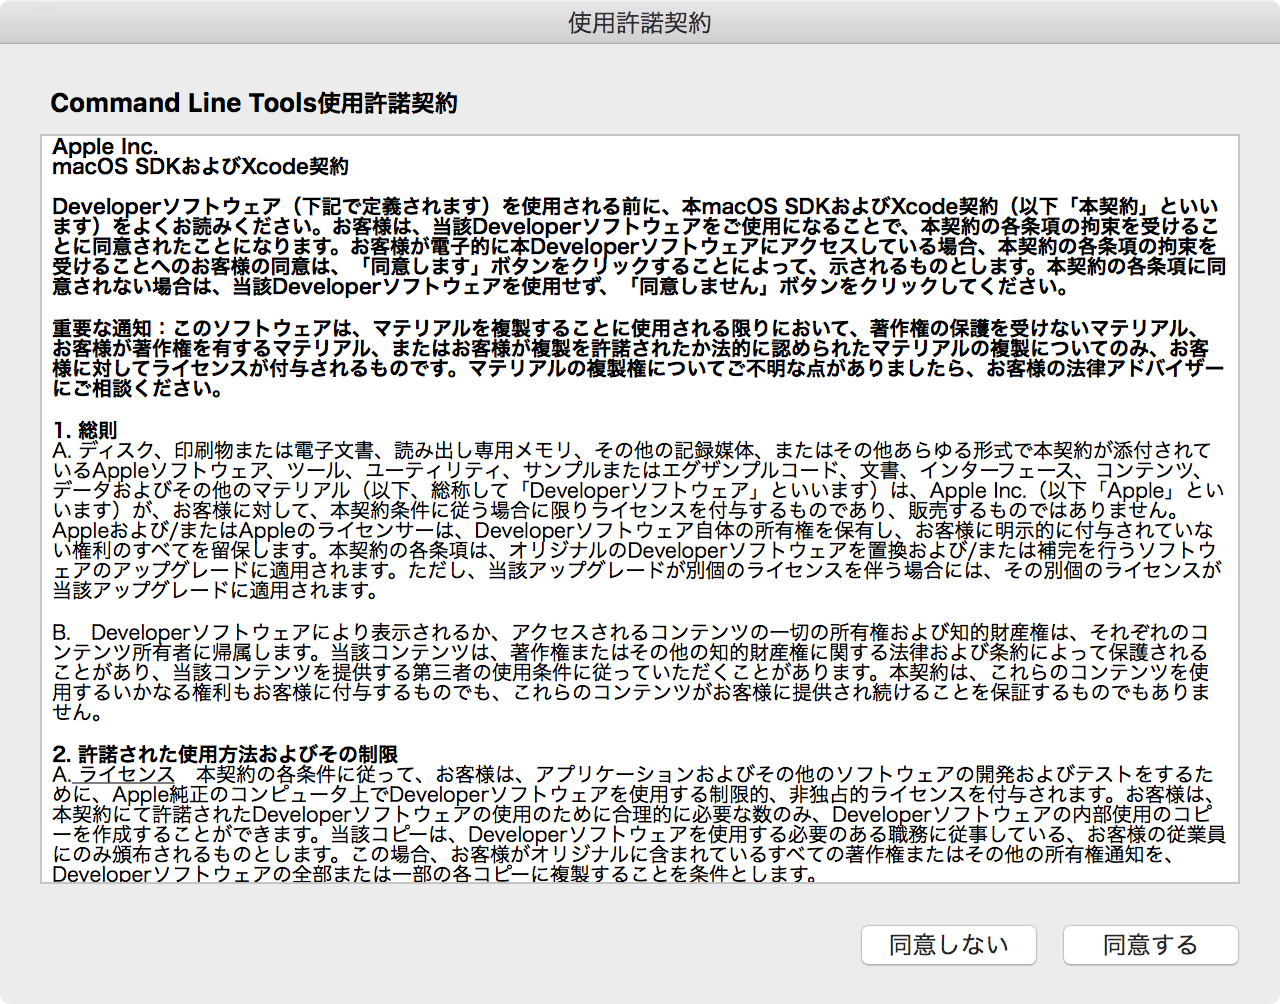
利用規約の同意画面が表示されますので「同意する」をクリックします。 するとインストールが開始されます。
インストールが完了すると、完了をあらわすダイアログが表示されます。
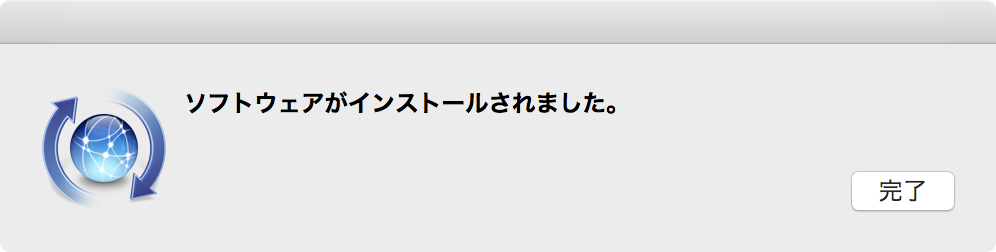
これで Command Line Tools for Xcode のインストールは完了です。
インストールコマンドの実行
Homebrew のホームページに書いてあるインストールコマンド を実行します。
/usr/bin/ruby -e “$(curl -fsSL https://raw.githubusercontent.com/Homebrew/install/master/install)”
つぎのようにインストールが開始されますので、指示の通りに Enter と管理者パスワードを入力してインストールを進めます。
$ /usr/bin/ruby -e "$(curl -fsSL https://raw.githubusercontent.com/Homebrew/install/master/install)"

==> This script will install:

/usr/local/bin/brew

/usr/local/share/doc/homebrew

/usr/local/share/man/man1/brew.1

/usr/local/share/zsh/site-functions/_brew

/usr/local/etc/bash_completion.d/brew

/usr/local/Homebrew

==> The following new directories will be created:

/usr/local/bin

/usr/local/etc

/usr/local/include

/usr/local/lib

/usr/local/sbin

/usr/local/share

/usr/local/var

/usr/local/opt

/usr/local/share/zsh

/usr/local/share/zsh/site-functions

/usr/local/var/homebrew

/usr/local/var/homebrew/linked

/usr/local/Cellar

/usr/local/Caskroom

/usr/local/Homebrew

/usr/local/Frameworks


Press RETURN to continue or any other key to abort エンターキーを入力

==> /usr/bin/sudo /bin/mkdir -p /usr/local/bin /usr/local/etc /usr/local/include /usr/local/lib /usr/local/sbin /usr/local/share /usr/local/var /usr/local/opt /usr/local/share/zsh /usr/local/share/zsh/site-functions /usr/local/var/homebrew /usr/local/var/homebrew/linked /usr/local/Cellar /usr/local/Caskroom /usr/local/Homebrew /usr/local/Frameworks

Password:管理者パスワードを入力

==> /usr/bin/sudo /bin/chmod g+rwx /usr/local/bin /usr/local/etc /usr/local/include /usr/local/lib /usr/local/sbin /usr/local/share /usr/local/var /usr/local/opt /usr/local/share/zsh /usr/local/share/zsh/site-functions /usr/local/var/homebrew /usr/local/var/homebrew/linked /usr/local/Cellar /usr/local/Caskroom /usr/local/Homebrew /usr/local/Frameworks

==> /usr/bin/sudo /bin/chmod 755 /usr/local/share/zsh /usr/local/share/zsh/site-functions

==> /usr/bin/sudo /usr/sbin/chown osca /usr/local/bin /usr/local/etc /usr/local/include /usr/local/lib /usr/local/sbin /usr/local/share /usr/local/var /usr/local/opt /usr/local/share/zsh /usr/local/share/zsh/site-functions /usr/local/var/homebrew /usr/local/var/homebrew/linked /usr/local/Cellar /usr/local/Caskroom /usr/local/Homebrew /usr/local/Frameworks

==> /usr/bin/sudo /usr/bin/chgrp admin /usr/local/bin /usr/local/etc /usr/local/include /usr/local/lib /usr/local/sbin /usr/local/share /usr/local/var /usr/local/opt /usr/local/share/zsh /usr/local/share/zsh/site-functions /usr/local/var/homebrew /usr/local/var/homebrew/linked /usr/local/Cellar /usr/local/Caskroom /usr/local/Homebrew /usr/local/Frameworks

==> /usr/bin/sudo /bin/mkdir -p /Users/osca/Library/Caches/Homebrew

==> /usr/bin/sudo /bin/chmod g+rwx /Users/osca/Library/Caches/Homebrew

==> /usr/bin/sudo /usr/sbin/chown osca /Users/osca/Library/Caches/Homebrew

==> /usr/bin/sudo /bin/mkdir -p /Library/Caches/Homebrew

==> /usr/bin/sudo /bin/chmod g+rwx /Library/Caches/Homebrew

==> /usr/bin/sudo /usr/sbin/chown osca /Library/Caches/Homebrew

==> Downloading and installing Homebrew...

(略)


==> Installation successful!


==> Homebrew has enabled anonymous aggregate user behaviour analytics.

Read the analytics documentation (and how to opt-out) here:

  https://git.io/brew-analytics


==> Homebrew is run entirely by unpaid volunteers. Please consider donating:

  https://github.com/Homebrew/brew#donations

==> Next steps:

- Run `brew help` to get started

- Further documentation:

    https://git.io/brew-docs
Homebrew が正常にインストールできたかは、 brew doctor コマンドで確認することができます。下の例のように「Your system is ready to brew.」と表示されればOKです。
$ brew doctor

Your system is ready to brew.
また、インストールされた Homebrew のバージョンは brew –version コマンドで確認することができます。
$ brew --version

Homebrew 1.8.2

Homebrew/homebrew-core (git revision 5c6a; last commit 2018-11-17)
お疲れ様です、これで Homebrew のインストールは完了です。 それでは、さっそく Homebrew を利用してみましょう。
Homebrew のコマンドを利用してみよう
Homebrew のコマンドは brew という名前です。 brew help コマンドで利用方法が確認できます。
$ brew help

Example usage:

  brew search [TEXT|/REGEX/]

  brew (info|home|options) [FORMULA...]

  brew install FORMULA...

  brew update

  brew upgrade [FORMULA...]

  brew uninstall FORMULA...

  brew list [FORMULA...]


Troubleshooting:

  brew config

  brew doctor

  brew install -vd FORMULA


Developers:

  brew create [URL [--no-fetch]]

  brew edit [FORMULA...]

  http://docs.brew.sh/Formula-Cookbook.html


Further help:

  man brew

  brew help [COMMAND]

  brew home
Homebrew を利用してインストールしたソフトウェアを確認するには brew list コマンドを利用します。 ただし、まだ Homebrew を利用してまだ何もソフトウェアをインストールしていませんので、次のように結果は空です。
$ brew list
早速、何かのソフトウェアをインストールしてみましょう。 Homebrew でインストールできるソフトウェアは Homebrew Formulae のページなどで確認することができます。 ここでは例として wget をインストールしてみようと思います。 brew install でパッケージ名を指定してインストールします。
$ brew install wget

==> Installing wget dependency: openssl

(snip)

==> Downloading https://downloads.sf.net/project/machomebrew/Bottles/wget-1.16.1.yosemite.bottle.tar.gz

######################################################################## 100.0%

(snip)

/usr/local/Cellar/wget/1.16.1: 9 files, 940K
wget コマンドが依存する openssl も同時にインストールされ、 wget が /usr/local/Cellar/wget/1.16.1 にインストールされました。 これでコマンドラインで wget を利用できるようになりました。
もう一度 brew list コマンドでインストールされたパッケージを確認します。 openssl と wget がインストールされていることを確認できます。
$ brew list

openssl wget
おわりに
本稿では macOS に Homebrew をインストールする手順について解説しました。 macOS での開発を便利するためには欠かせないツールですので、ぜひ導入したいものです。
更新履歴
- 2014年05月25日 – 初版を執筆しました。
- 2014年12月29日 – Mac OS X Yosemite に合わせて記事を更新しました。
- 2017年02月10日 – macOS Sierra に合わせて記事を更新しました。
- 2018年11月18日 – macOS Mojave に合わせて記事を更新しました。