本連載はバーコードを操作/生成することができる Java ライブラリ ZXing について解説をしています。 前回は、ITFバーコードの生成についてサンプルプログラムで示しました。 今回はQRコードを生成する方法について解説します。
QRコードを生成しよう
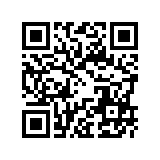
今回は普段の生活の中に溢れているコードの一つ「QRコード」を ZXing で生成するサンプルプログラムを示したいと思います。 今回のサンプルプログラムを実行すると、次のようなQRコードを生成することができます。

それでは、サンプルプログラムを見ていきましょう。
package sample.zxing;


import java.awt.image.BufferedImage;

import java.io.File;

import java.io.IOException;

import java.util.Hashtable;


import javax.imageio.ImageIO;


import com.google.zxing.BarcodeFormat;

import com.google.zxing.EncodeHintType;

import com.google.zxing.WriterException;

import com.google.zxing.client.j2se.MatrixToImageWriter;

import com.google.zxing.common.BitMatrix;

import com.google.zxing.qrcode.QRCodeWriter;

import com.google.zxing.qrcode.decoder.ErrorCorrectionLevel;


public class Main {

  public static void main(String[] args) {

    try {

      String        contents = "http://photo.oscasierra.net";

      BarcodeFormat format   = BarcodeFormat.QR_CODE;

      int           width    = 160;

      int           height   = 160;


      Hashtable hints = new Hashtable();

      hints.put(EncodeHintType.ERROR_CORRECTION, ErrorCorrectionLevel.M);


      QRCodeWriter writer = new QRCodeWriter();

      BitMatrix bitMatrix = writer.encode(contents, format, width, height, hints);

      BufferedImage image = MatrixToImageWriter.toBufferedImage(bitMatrix);

      ImageIO.write(image, "png", new File("barcode.png"));

    }

    catch( IOException e ) {

      e.printStackTrace();

    }

    catch (WriterException e) {

      e.printStackTrace();

    }

  }

}
今回も前回同様、上のプログラムで重要なのは try で囲まれた実質10行だけです。 最初の4行, 次の2行, 後の4行をそれぞれ解説します。
最初の4行は次のようになっています。
String        contents = "http://photo.oscasierra.net";

BarcodeFormat format   = BarcodeFormat.QR_CODE;

int           width    = 160;

int           height   = 160;
変数名からなんとなく意味が分かると思いますが、 contents はバーコードで表したい内容です。 ここでは http://photo.oscasierra.net (筆者の別HP)というURLをQRコードで表現します。
format は生成するバーコードの種類を、width は生成するバーコードの幅、height は生成するバーコードの高さを宣言しています。
次の2行はQRコード特有のオプションの指定です。
Hashtable hints = new Hashtable();

hints.put(EncodeHintType.ERROR_CORRECTION, ErrorCorrectionLevel.M);
バーコードを生成する際のヒントとなる hints を宣言し、次の行で QR コードのエラー補正のレベル ErrorCorrectionLevel を指定しています。 補正レベルは次の値を利用できます。
- ErrorCorrectionLevel.L : 7%の補正レベル
- ErrorCorrectionLevel.M : 15%の補正レベル
- ErrorCorrectionLevel.Q : 25%の補正レベル
- ErrorCorrectionLevel.H : 30%の補正レベル
後半の4行は次のようになっています。
QRCodeWriter writer = new QRCodeWriter();

BitMatrix bitMatrix = writer.encode(contents, format, width, height, hints);

BufferedImage image = MatrixToImageWriter.toBufferedImage(bitMatrix);

ImageIO.write(image, "png", new File("barcode.png"));
QRコードを出力するためのクラス QRWriter をインスタンス化して、上で宣言した変数やヒントを encode メソッドに指定してビットマトリックスを生成しています。
あとは生成したバーコードのビットマトリックスを画像ファイル “barcode.png” として PNG 形式で保存したいため、ImageIO を利用してファイルに出力しています。
おわりに
今回はQRコードを生成するサンプルプログラムを示しました。 ZXing を利用してのバーコード生成についてご理解頂けたでしょうか?
>


